Have you ever withnessed 403 forbidden error when you visit an empty website directory or a specific page that has a permission error. Or when you are working with Elementor page builder and trying to save but it is not saving the page or post?
If you are working with Elementor and notice such, well this post will address all the issues. This can also be because most websites are set up to disallow directory browsing to prevent attackers from accessing sensitive files.
However, when either you or your visitors encounter such error on your site, it’s mandatory to fix the issue or you may risk losing valuable traffic. There are many ways .to resolve the 403 errors.
This post will explain the different types of 403 forbidden errors in existence, their possible causes, and also provide eight methods to fix the 403 forbidden error.
| Error code | 403 Forbidden Error |
| Error type | Client-side error |
| Error variations | Forbidden: You don’t have permission to access [directory] on this server HTTP Error 403 – Forbidden Error 403 – Forbidden 403 forbidden request forbidden by administrative rules 403 Forbidden Access Denied – You don’t have permission to access Error 403 HTTP 403 Forbidden |
| Error causes | Missing index page Broken WordPress plugin Wrong IP address Malware infection New web page link Mod-security blocking for elementor cases |
Table of content
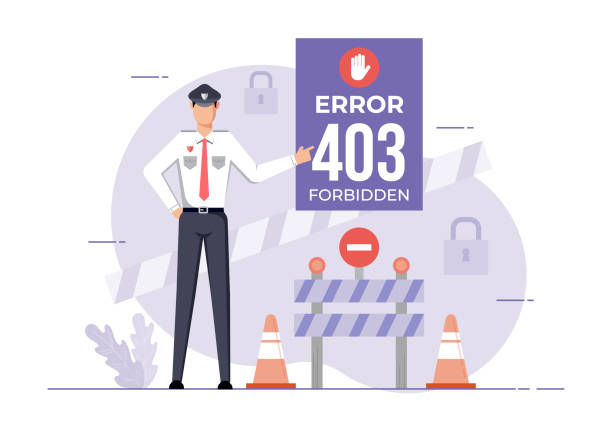
What Is a 403 Forbidden Error?
403 Forbidden – you don’t have permission to access this resource is an HTTP status code (client side) that occurs when the web server understands the request but can’t provide additional access.
According to wikipedia: The HTTP 403 is an HTTP status code meaning access to the requested resource is forbidden. The server understood the request, but will not fulfill it.
Wikipedia
Causes of 403 Forbidden
In most cases, 403 forbidden errors are caused by an access misconfiguration on the client-side, which means you can usually resolve the issue yourself. But in a rare case, you may need your hosting provider to help. Keep reading to see how to solve this without the hosting company helping.
The common reason for these errors is usually the file or folder permission settings, and this controls who can read, write, and execute the file or folder.
Possible cause here is: either the web owner edited the settings so that you couldn’t access the resources, or they didn’t set the correct permissions.
Another common cause is corrupt or incorrect settings in the .htaccess file. This might happen after you’ve made changes to the file. Luckily, it’s easy to solve the issue by simply creating a new server configuration file.
Other than those two common causes, here are some other possible causes for the error:
- Missing index page – This is when the website’s landing page (home) name is not index.html or index.php.
- Faulty WordPress plugin – When you have a WordPress plugin that is not configured correctly or is not compatible with another plugin, this may trigger the 403 errors.
- Wrong IP address – when you have your domain name pointing to a wrong or old IP address which now hosts a website that blocks your access.
- Malware infection – a malware infection may cause the .htaccess file to be constantly corrupted. You’ll need to remove the malware before restoring the file.
New web page link – the site owner may have updated the page’s link, which is now different from the cached version.
How to Fix the 403 Forbidden Error
Do you know that the HTTP 403 forbidden error is closely related to file access permissions, this will be the main focus of the following methods to solve it.
The steps here are mainly focus on WordPress, but they can be applied to other websites as well. Let’s look at them holistically.
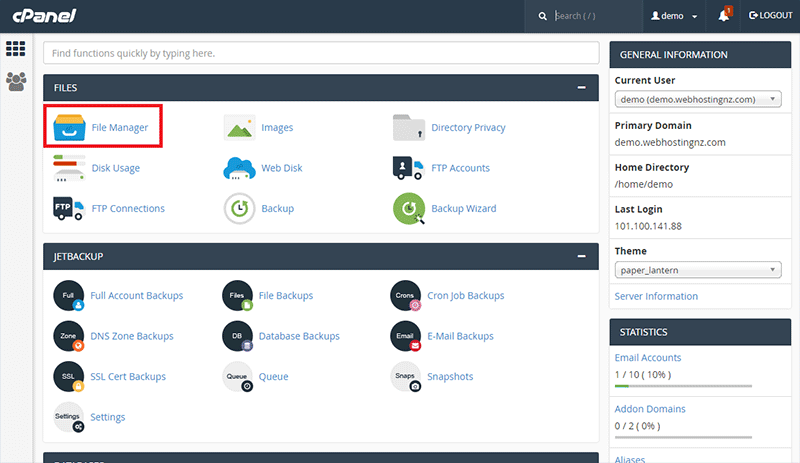
1. Check the .htaccess File
Most hosting service providers often hides this in the site directory. You can follow these steps to locate the .htaccess:
- Find the File Manager on the cPanel dashboard.
- Open the public_html directory to find the .htaccess file.
- Locate File Manager on cPanel.
- In the public_html directory, look for the .htaccess file.
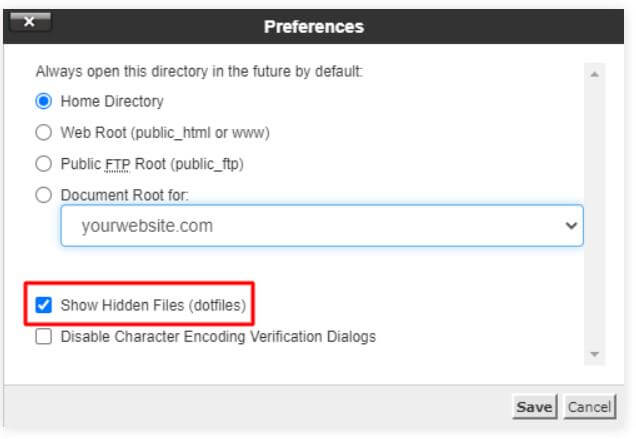
- If you can’t find the file, click on Settings on the top-right corner of the screen and enable the Show Hidden Files (dotfiles) option.
The .htaccess file is a server configuration file and mainly works by altering the Apache Web Server settings.
Although the file is present on most websites by default, you need to create a new file manually if your website doesn’t have it or if it was deleted unintentionally.
Once you find the file, follow these steps to know if it is a wrong configuration causing the error:
- Right-click on the file and select Download to create a backup. When you have the backup, delete the old file.
- Now try accessing your website. If it works fine, then you know that the file was corrupted.
- To generate a fresh .htaccess file, log in to your WordPress dashboard and click on Settings -> Permalinks.
- Without making any changes, click the Save Changes button at the bottom of the page.
The action will generate a fresh .htaccess file for your website. If you did not get the solution via this step, then try the next step below.
2. Reset File and Directory Permissions
If you tried the first step and it does not work, then try this. The second possible cause triggering HTTP 403 errors is an incorrect permissions for files or folders.
You can use the FTP to edit file and folder permissions. To begin, you should:
- Configure the FTP client and connect it to your website.
- Once connected, right-click public_html and select File Attributes.
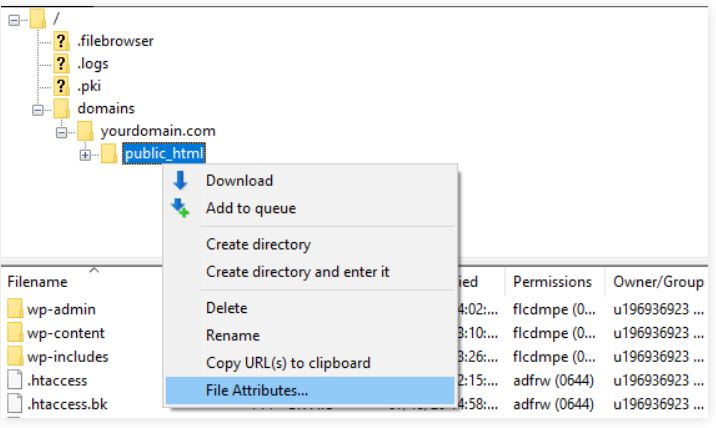
- You need to input permission 755 in the Numeric value field, select Apply to directories only, and press OK.
There are some standard practice for file permission numeric values and this involves using 755 for folders, 644 for static content, and 700 for dynamic content.
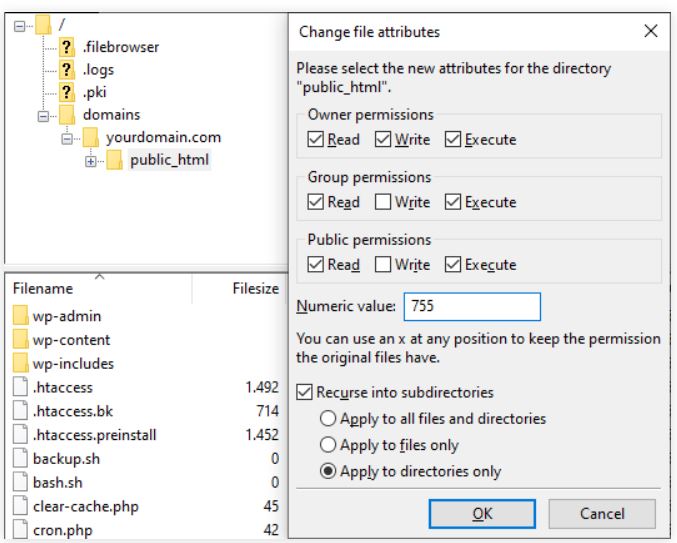
- After changing folder permissions, repeat step 2 and step 3, but now enter 644 in the Numeric value field and select the Apply to files only option.
Once done, try accessing your website and see if the error is resolved.
3. Disable WordPress Plugins
For you to be on this step and none of the previous methods worked for you maybe as a result of the error being caused by an incompatible or faulty plugin. Well, we will disable the plugins to check whether doing so fixes the 403 forbidden error.
We recommend disabling all the plugins at once instead of going through the process of one by one. This will ensure we get the root cause of the problem and hopefully solve the error. Try the following:
- Access your hosting account either via FTP or cpanel and go to the public_html -> wp-content folder.
- Locate the plugins folder.
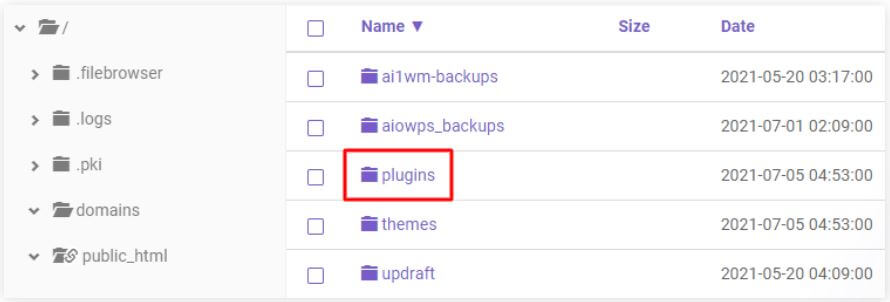
- Rename the folder with a different name like “plugins-disbaled” to disable all plugins.
Try to reaccess the website. If the error is no longer there, a miscofigured plugin is the actual source of the error.
You can now rename the folder back to plugins. You have to disable the plugins one after the other from your WordPress dashboard and check if the site is still working. This way, you will be able to detect the faulty plugin.
However, if the error still appears, you may need to contact your hosting provider for assistance.
4. Upload an Index Page
Your website’s homepage name should be named index.html or index.php. If it’s not, then there are two other ways. The first and simplest one is to rename the homepage as index.html or index.php.
However, if you want to keep the current homepage name, upload an index page to your public_html directory and create a redirect to your existing homepage.
Here are the steps to follow:
- Upload an index.html or index.php file to your public_html directory. Use your Cpanel or FTP to do so.
- Open the .htaccess file.
- Insert this code snippet to redirect the index.php or index.html file to your existing homepage. Don’t forget to replace homepage.html with the page’s actual name.
Redirect /index.html /homepage.html
5. Edit File Ownership
It is also known fact that a wrong file ownership can trigger the 403 forbidden error if you use Linux or VPS hosting.
Also, files and folders can be assigned to an Owner, a Group, or both. For this purpose you need SSH access to modify ownership in these environments. You’ll also need an SSH terminal to connect to the VPS server.
After the SSH has been connected to your web server, verify the ownership by using this SSH command: ls -1 [file name]
The result will look something like this: -rwxrw-rw- 1 [owner][group] 18 Feb 22 12:00 filename.txt
Look at the owner and group part. The correct ownership should be your hosting account’s username. If you see different ownership, use the chown Linux command to modify file ownership. Here’s the basic syntax for chown: chown [owner][:group] [file name]
For example, if your username is Digiconceptng, use syntax like this: chown Digiconceptng filename.txt
6. Verify the A Record
If your domain name points to the wrong IP address, it can trigger 403 forbidden error. Hence, you won’t have a permission to view the content. Therefore, double-check that your domain name points to the correct IP address.
To check if the domain A record is pointed correctly, access the DNS Zone Editor on your CPanel:
- Log in to your CPanel.
- Go to the Advanced section and tap the DNS Zone Editor.
- locate the list of DNS records. Find a record with the label A in the type column.
- Check the IP address on the Content column.
- If it’s pointing to the wrong IP address, click Edit to change it. Once you’ve finished, click Update.
In a situation you could not find the correct A record, create a new one from the Manage DNS records section. Make sure you select A as the Type and insert the correct IP address into the Points to field. Then, click Add Record.
Another point to note: I recently migrated a site from a host to another web host and forgot to change the nameservers, this domain was still pointing to my old web host. Once the old host cancels my account, this caused a 403 error status code.
Ensure to point to the right NS
7. Scan for Malware
Malware is another cause of 403 forbidden error. If your website becomes infected by malicious software, it may constantly keep injecting unwanted code into the .htaccess file. No matter how you keep fixing the file using the methods above, the error will persist.
Ensure to scan your website to spot any malware. A lot of of security plugins available on WordPress such as Sucuri or Wordfence can help.
WordFence has the ability to remove malware. Once the plugin identifies all infected files, you’ll get actionable options for these files, such as deleting or restoring them.
You can also fix this by restoring the website using backup files. It’s also possible to restore it using the database backup if you don’t have a complete backup of the site files.
8. Clear Your Web History/Cache
In some cases, web browser’s cache and cookies may cause a 403 error. Web cache helps store data to make a website load faster the next time you visit it. However, it’s possible the link on the site has been updated, and the actual web page link is now different from the cached version.
Another possibility is that the error comes from the cookies. It may be the case on a website that you usually log in normally, but the latest login attempt showed you this error message.
Clear the browser cache and cookies to help resolve this issue. Note that clearing the cache may cause the next visit to the website to take a bit long loading as your browser will ask for all the site files again. Clearing the cookies also signs you out from all logged-in websites.
Steps to clear the cache and cookies on Google Chrome:
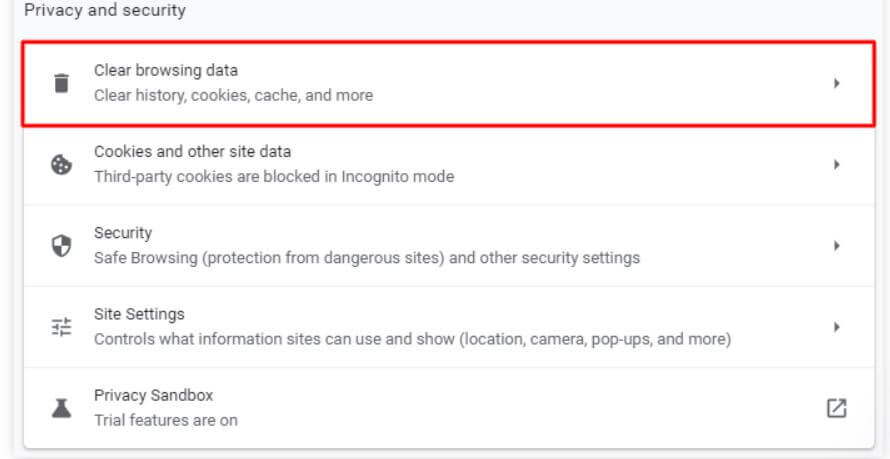
- Click on the three-dot icon on the top right corner and select Settings.
- Find the Privacy and security section and click Clear browsing data.

- Use the drop-down menu to select the time frame for data deletion. Then, check the Cookies and other site data and Cached images and files options.
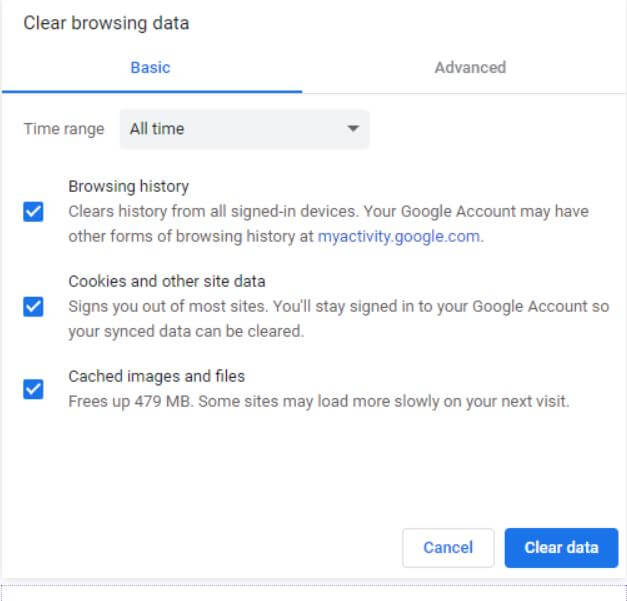

- Click Clear data.
Once you’ve completed all the steps, try revisiting the website and logging in if it requires you to do so. If this or any other solutions don’t work, we recommend contacting our support team via live chat to resolve this issue.
Troubleshooting Other 4xx Errors
9. Mod Security reset
Sometimes if you are working with elementor and trying to save, it will display 403 forbidden error. The best way to resolve this if you notice it via this way. Simple deactive or whitelist the page from mod security. If you can’t, simply contact your web hosting provider and they can help you with this.
Conclusion
It can be frustrating when faced with 403 forbidden errors can cause a great deal of frustration as they will prevent you from accessing the resource. A major cause is due to incorrect file permissions, but there are several other possible causes, like a missing index file, faulty plugins, or even a malware infection.
To find the real culprit of the 403 errors can be tricky. But we trust that the steps explained in this post will definitely solve the problem.
As a webmaster, it is good to learn more about these errors so that you know how to handle any issue if they ever appear on your website.
Trust this post has been helpful? Kindly share and like on social media