
Modern digital communication places a heavy premium on visual clarity. Whether you are a remote worker trying to explain a complex software bug to a colleague across the country, an educator creating step by step tutorials for students, or a content creator building a following on social media, text alone often fails to convey your message. Explaining a technical workaround or software interface via email frequently leads to endless back and forth messages and severe communication gaps.
The most efficient solution to this modern challenge is a high quality screen recording. Capturing your display in real time provides an undeniable level of clarity, turning a confusing tech issue into a straightforward visual explanation. Fortunately, the era of paying for premium screen recording licenses just to capture basic video clips is over. Operating systems for computers and mobile devices now feature deeply integrated utilities that let users capture high definition video and system audio at zero cost.
This comprehensive guide delivers a practical look at how to record your screen for free across Windows, Mac, iOS, and Android systems. We will move past basic overviews to analyze exactly how to maximize these built-in tools, how to configure open source alternatives for professional use, and how to preserve your storage space while maintaining crisp visual output.
Quick Reference Overview of Free Screen Recording Utilities
| Operating System | Built-In Tool | Best Free Alternative | Key Limitation to Keep in Mind |
|---|---|---|---|
| Windows | Xbox Game Bar | OBS Studio / ShareX | Game Bar cannot record desktop or File Explorer interfaces |
| macOS | Screenshot Toolbar | QuickTime Player | Internal system audio capture requires virtual audio routing |
| iOS | Control Center Recorder | Loom | High resolution recordings consume massive storage space |
| Android | Quick Settings Recorder | ADV Screen Recorder | External audio quality depends heavily on device microphone |
Windows: Built-in Utilities and Advanced Open Source Tools
The Windows operating system offers multiple avenues for capturing your screen without spending a kobo. Depending on whether you need a quick capture of a single application or a multi-window tutorial, Microsoft provides native software that handles the task efficiently.
Get TikTok SEO Cheat here
The Built-in Option: Xbox Game Bar
Originally designed for PC gamers to capture their gameplay highlights, the Xbox Game Bar has evolved into a standard tool for everyday productivity. It comes pre-installed on both Windows 10 and Windows 11 systems, requiring no extra setup or configuration.
To activate the utility, press the Windows Key + G simultaneously on your keyboard. This shortcut immediately brings up an overlay containing various system performance widgets and the essential Capture module. To begin recording, click the circular Record icon or press the secondary shortcut Windows Key + Alt + R.
The main drawback of the Xbox Game Bar is its lack of desktop flexibility. The tool is engineered to lock onto a single active application window. If you minimize that specific application, switch to your desktop, or attempt to open the system File Explorer, the recording will automatically terminate. For straightforward single-app demonstrations, however, its performance is incredibly lightweight and reliable.
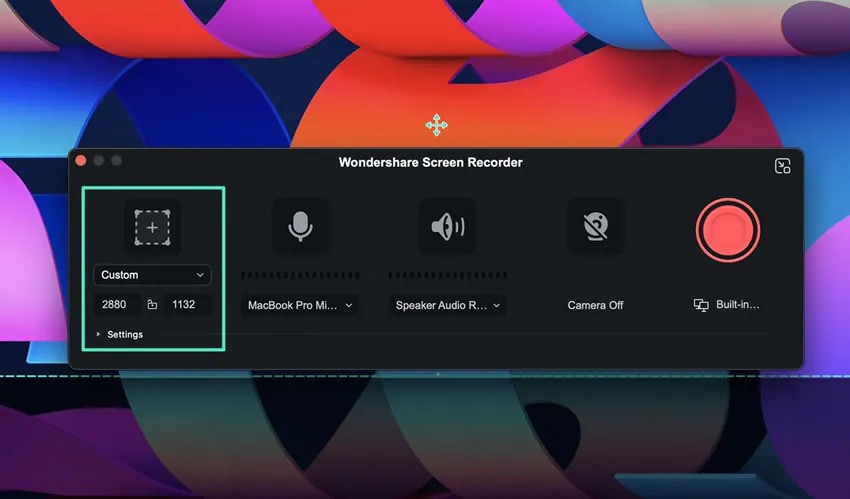
The Professional Alternative: OBS Studio
When your presentation requires you to switch between multiple software applications, capture the entire desktop interface, or overlay a live webcam feed, the built-in Game Bar falls short. This is where Open Broadcaster Software, universally known as OBS Studio, becomes necessary. OBS Studio is an open source program that offers professional-grade recording capabilities completely free of charge.
Setting up OBS Studio for a standard screen capture involves a brief initial configuration:
- Download and install the software from the official repository.
- Launch the application and navigate to the Scenes box at the bottom left, ensuring a primary scene is active.
- Move to the Sources box next to it, click the + icon, and select Display Capture to mirror your entire monitor interface.
- Open the Settings panel from the lower right corner, click on Output, and change your Recording Format to MP4 or MKV for maximum compatibility.
- Return to the main screen and click Start Recording to begin your session.
OBS Studio processes video directly via your computer hardware, ensuring that your final file remains smooth and free of choppy frames, even when recording resource-heavy applications.
macOS: Seamless Recording via Native Ecosystem Tools
Apple provides Mac users with highly optimized, intuitive methods for capturing desktop activity. The integration between hardware and software allows for fluid screen recording without impacting system performance.
The Quick Access Method: Screenshot Toolbar
For users running modern iterations of macOS, the fastest way to initiate a capture is through the native Screenshot utility. By pressing Command + Shift + 5, an interactive overlay appears at the bottom of your display screen.
This toolbar gives you two specific recording options. You can choose to capture your entire display or select a highly specific windowed portion of the screen. Before hitting the record button, clicking the Options menu allows you to choose your file save location, set an intentional five or ten second delay timer, and select your audio input source. Once configured, click Record. When your presentation is finished, click the small Stop icon located in the menu bar at the very top of your screen.
The Legacy Alternative: QuickTime Player
If you are working on an older version of macOS, QuickTime Player remains an excellent alternative tool for high-definition video capture.
Open QuickTime Player from your Applications folder, click File in the upper menu bar, and select New Screen Recording. A small capture window will appear. Clicking the downward arrow next to the red record button allows you to select your internal microphone to overlay voice commentary. The utility saves final files in the highly optimized MOV format, which can be immediately edited in iMovie or shared directly across remote communication platforms.
Mobile Solutions: Native Capture on iOS and Android
Capturing screen activity on mobile devices has become incredibly straightforward, as both major mobile platforms now include native recording functionality within their core user interfaces.
iPhone: Customizing the Control Center
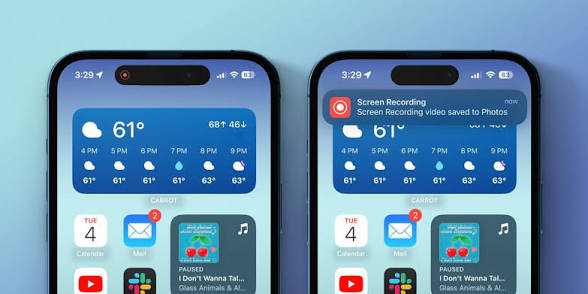
Apple handles mobile screen recording via a dedicated toggle switch hidden inside the system Control Center. Before you can use it, you must ensure the feature is active within your user settings.
Open your system Settings app, navigate to Control Center, and scroll down to locate the Screen Recording option. Tap the green plus icon next to it to move the utility into your active control layout.
Now, pull down from the top right corner of your iPhone screen to access the Control Center. You will spot a circular recording icon. Tapping this button triggers a brief three-second countdown before your device begins capturing the screen. If you need to record your voice simultaneously to explain what is happening on screen, press and hold the record icon for two seconds to reveal a hidden sub-menu where you can toggle the device microphone on.
Android: Quick Settings Deployment
Modern Android devices running stock software or specialized manufacturer skins feature a built-in recorder directly inside the notification shade.
Swipe down twice from the top of your Android display to fully reveal the Quick Settings grid. Look for the tile labeled Screen Record or Screen Capture. If it is not immediately visible, tap the pencil edit icon at the bottom of the tray to drag the hidden tile into your active grid.
Tapping the Screen Record tile launches a system prompt asking you to define your audio preferences. Android allows you to record pure device audio internally, capture the external microphone, or record both sources simultaneously. This dual-source feature makes Android particularly useful for troubleshooting app issues or demonstrating mobile software bugs.
Third Party Platforms for Specialized Remote Workflows
While built-in tools handle standard video capture, certain business or creative scenarios require specialized third-party tools to optimize efficiency.
- ShareX stands out as an exceptional open-source option for Windows users who need to generate quick, lightweight files or animated GIFs. It allows you to automate your workflow, instantly saving files to specific folders or generating copyable links the moment you press stop.
- For remote workers who need to send rapid visual explanations to clients or teammates, the free tier of Loom offers immense value. Loom captures your screen and your webcam simultaneously, placing your face in a polished circular bubble in the corner of the video. The true benefit of Loom is that it uploads the video to the cloud in real time as you speak. The moment you click stop, a shareable link is generated instantly, removing the need to wait for long video rendering cycles or manual file uploads.
Essential Tips for Professional Quality Recordings
To ensure your free recordings look polished, clean, and professional, implement these structural configuration tips before hitting the record button:
- Manage Active System Audio: Always verify your audio input channels. If you are using an external microphone, ensure the recording tool is explicitly pointed to that hardware source rather than your laptop’s built-in microphone, which can pick up heavy background fan noise.
- Optimize Visual Resolution: Recording at native 1080p resolution hits the ideal balance between crisp text legibility and manageable file sizes. Avoid recording in ultra-high 4K resolutions unless absolutely necessary, as it can result in laggy frame rates on budget hardware.
- Clean Your Visual Workspace: Before starting a screen capture, close all unnecessary browser tabs, clear out clutter from your desktop background, and temporarily disable system notifications to protect your privacy and keep your viewer focused on the subject matter.
- Control Your Cursor Movement: Move your mouse deliberately and slowly. Rapid, erratic cursor movements distract viewers and make technical tutorials significantly harder to follow.
Frequently Asked Questions on Free Screen Recording
Why is there no sound on my Windows screen recording?
This issue usually stems from audio routing errors within the Xbox Game Bar settings. Press the Windows Key + G, open the Audio widget, and ensure that your active output device is mirrored under the Mix tab, and check that application volumes are unmuted.
How do I record internal audio on a Mac without capturing outside microphone noise?
Apple blocks direct internal audio routing for security reasons. To capture system sound cleanly for free, you will need to utilize an open-source virtual audio driver such as BlackHole to route your system audio output directly into your recording software as an input channel.
Do these free screen recording tools apply watermark overlays to my final video files?
No. All native utilities built into Windows, macOS, iOS, and Android capture your display cleanly without any watermarks, time restrictions, or forced branding elements. Open source tools like OBS Studio and ShareX also guarantee completely clean video outputs.
Read More On: