

WiFi is today’s version of treasure; it offers us access to almost all of the world’s resources, makes it easy to connect with friends, and even makes it possible to work.
Are you trying to figure out the cause of your Windows or MacBook’s inability to connect to Wi-Fi? Nothing is more annoying than not having access to the internet when you need it. But don’t worry—a simple fix is available! This article will show you how to diagnose and resolve Wi-Fi connectivity issues on any Windows or Mac laptop.
What Prevents Laptop From Connecting to Wifi?
A wide variety of factors, such as wireless signal interference, airplane mode activated, delayed network services, and an outdated network adapter, can prohibit your laptop from connecting to Wi-Fi.
Additionally, if you don’t restart the router frequently, there may be a breakdown in connection between your device and the router.
Get TikTok SEO Cheat here
Use your phone, tablet, or any other available device to see if you can connect to the Wi-Fi. If they are unable to connect, it is rather obvious that your Wi-Fi is the cause of the issue.
Your modem and router could be malfunctioning or there could be an internet outage. This may also be helped by resetting them.
14 Effective Ways to Fix a Laptop (Windows or Mac) that Won’t Connect to Wifi
There’s a good probability you’re not connected to your network and can’t access the internet if you can’t access email, browse the online, or stream music. Here are a few solutions you might attempt if the issue persists.
1. Check your laptop’s Wi-Fi button or switch
In order to easily enable or off Wi-Fi connection, certain PC notebooks have a physical Wi-Fi button or switch located next to the keyboard. Ensure the switch is in the On position if you have one like that. When the Wi-Fi switch is turned on, a light generally (but not always) illuminates.
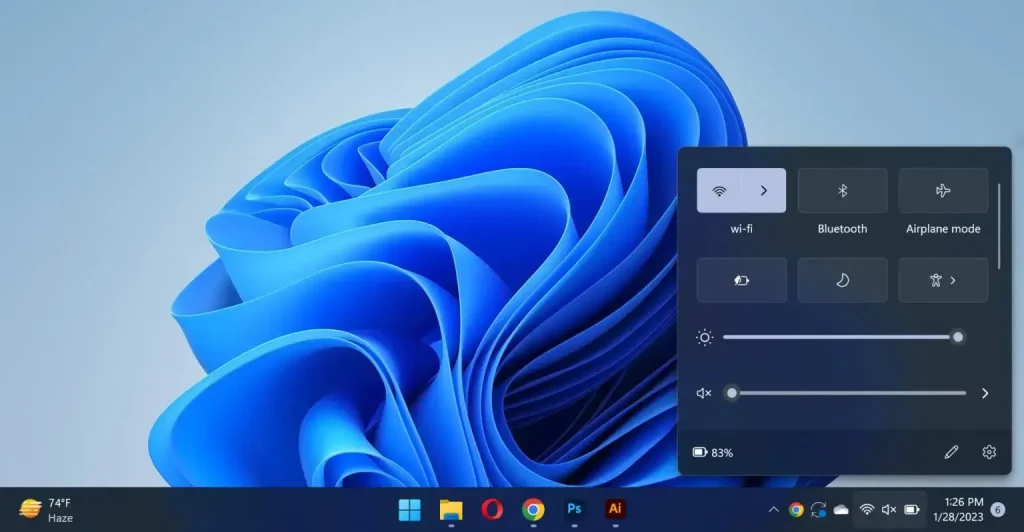
Additionally, make sure that the Wi-Fi setting under “Network & Internet” options is indeed turned on. Clicking the network connection tab button will take you there. The bottom tab will glow blue in Windows 10 or 11 if Wi-Fi is activated.
2. Disable Airplane Mode
Having airplane mode turned on is another ignored yet typical cause. If you didn’t want social media to bother you while you were away, you might have accidentally toggled it on
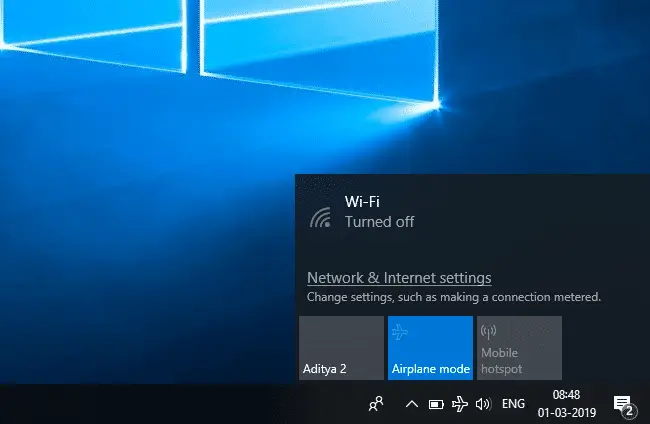
Therefore, it’s important to double-check that airplane mode has been turned off. It can be found in your Wi-Fi settings. If it is off, it will appear grayed out.
3. Restart your computer.
Many issues, including those involving networking connections and Wi-Fi, can be resolved by doing this. Check to see whether the issue is fixed with a fast reboot before moving on to troubleshooting.
4. Try joining a Wi-Fi network (Windows & Mac)
You should see a list of nearby wireless networks you can connect to if you click the “No internet access” indicator on the taskbar once more. Click to connect if you find the network you’re looking for.
If you’re using Windows 11, select the “No internet access” symbol, then, to display the list of networks, click the right arrow next to the Wi-Fi tile.
If the network you wish to connect to isn’t visible, try getting closer to the wireless access point.
Click Connect to rejoin after clicking Disconnect if you are connected to a wireless network but unable to access the internet.
For MAC,
If you can access Wi-Fi but not the internet, run Wireless Diagnostics.
- Simply Close every open app.
- While clicking the Wi-Fi icon in the menu bar, hold down the Option key.
- Open Wireless Diagnostics by clicking.
- To enable your Mac to check your wifi connection, adhere to the on-screen instructions.
- If any difficulties are discovered, click the tiny “i” in a circle next to each one to see a list of steps to take.
5. Forget and re-add the network (Windows & Mac)
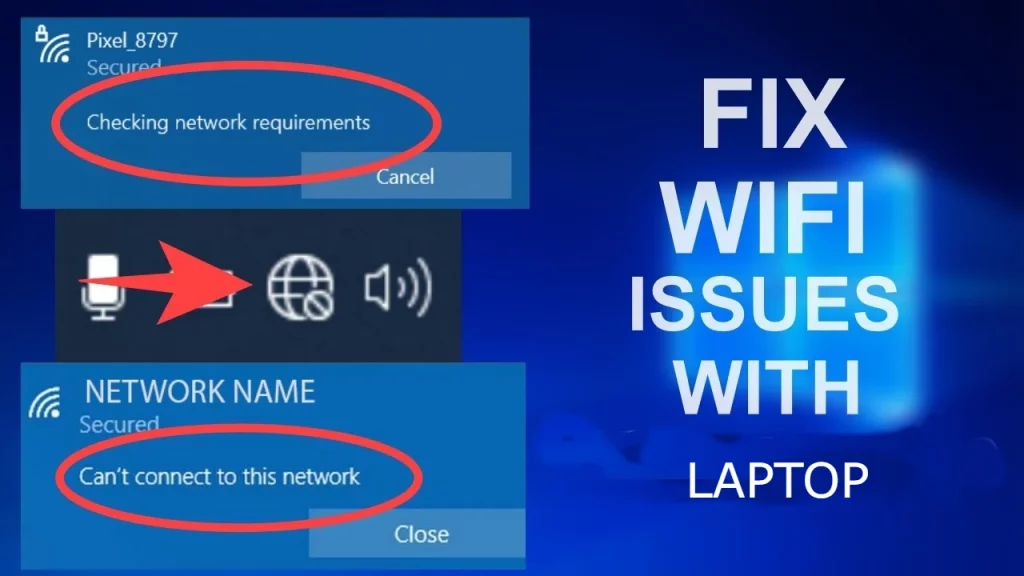
For Windows: When attempting to connect, if you get an error saying “Can’t connect to this network,” the profile may be corrupt.
- In the shortcut menu, choose Network and Internet Settings by right-clicking the “No internet access” indicator next to the time.
- Tap WiFi.
- Simply select Manage known networks.
- When unable to connect to a network, click Forget.
- Closing this window will allow you to reconnect to the network again by clicking the “No internet access” symbol. Re-enter the password if necessary.
For Mac:
- System Preferences is available by clicking the Apple menu.
- Select Network.
- Tap WiFi.
- Advance: Click.
- To remove a network, select it and press the minus symbol.
- select Remove.
- Then, attempt a network reconnection after closing all open windows. If the Wi-Fi password was previously saved, it must be entered again.
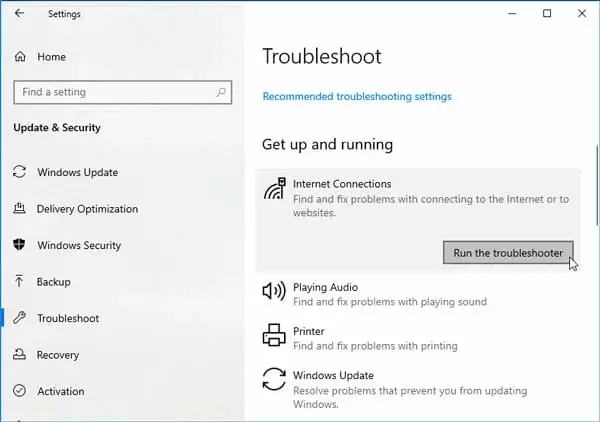
6. Run the network troubleshooter
A built-in Windows diagnostic tool called Network Troubleshooter can be used to find and fix connectivity problems. Depending on the version of Windows you are using, the directions to get there may be slightly different:
Windows 10:
- Select Settings (the gear icon) from the Windows Start menu by clicking on it.
- Select Network & Internet.
- Select Status.
- After selecting Network Troubleshooter, adhere to the on-screen directions.
Windows 11:
- Select Settings (the gear icon) from the Windows Start menu by clicking on it
- Select System.
- Select Troubleshoot from the menu.
- Select Other troubleshooters.
- Select Network Adapter by clicking.
- To fix problems, select Run and follow the on-screen directions.
You ought to be able to connect to a Wi-Fi connection if the troubleshooter resolves the problems. Restart your computer if the troubleshooter is unsuccessful.
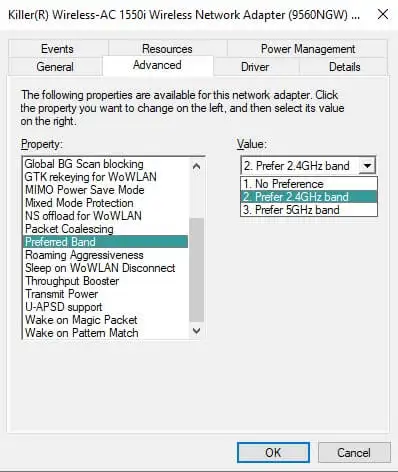
7. Try connecting to another frequency band
You can connect to two different network bands (2.4 GHz and 5 GHz) with some routers (dual-band routers). Each has advantages and disadvantages; 5G hz is generally faster but has a shorter range than 2.4 Ghz.
If the current network frequency band isn’t working, try connecting to a different band. They usually have the same Wi-Fi network name, but their last letters will either be 2.4G or 5G.
Another option is to switch to a different Wi-Fi channel, perhaps one that is less congested or less well-liked in your neighborhood. To find the most popular channels close to where you are, utilize an app like Wifi Analyzer.
Although not every router offers this option, if it does, you can find it in the router’s advanced wireless settings:
- enter in your router’s IP address which is normally found on the back of the router, into your web browser.
- Admin login and password are entered for your router. Again, you can locate this info on the router’s back. (as long as nothing has been altered)
- Locate “Wireless Settings” (often under “Advanced Settings”) and click on it.
- The “Channels” option should be chosen after disabling any “Auto-Connect” options.
- If necessary, adjust the Wi-Fi channel. Typically, your best bets are 1, 6, or 11.
- Implement the changes.
Be advised that following procedures may vary according on the manufacturer and the model of your router. You can ask your manufacturer for help or consult the router’s manual if you’re having trouble.
Continue reading for our next round of troubleshooting procedures if your laptop still won’t connect to the Wi-Fi.
8. Update or reinstall the network adapter
Can’t even see your Wi-Fi icon? The usual cause is that your network adapter isn’t being detected by your system for some reason. Therefore, it’s worthwhile to try reinstalling it to check if your connection returns.
Here is how to approach the procedure:
- Right-click the Windows “Start” icon and choose “Device Manager.”
- “Network Adapters” tab should be selected.
- There will be a few alternatives when you click on the Wi-Fi adapter, so be careful to choose the right one (it will typically have Wi-Fi written in the name).
- Select “Uninstall Device” by performing a right-click on the Wi-Fi adapter.
- Select “Uninstall” from the menu.
- Restart your laptop. The Wi-Fi adaptor will be reinstalled by Windows automatically.
- Verify to see if the problem has been resolved. Move on to the next step if it isn’t.
- Return to Device Manager and do a right-click on the Wi-Fi driver.
- Choose “Update.”
- Select the “Browse My Computer for Drivers.”
- Choose “Let Me Pick From a List of Available Drivers” from the drop-down menu.
- A few driver versions will show up under models. Choose the most recent version (the date will typically be displayed for each one on laptops) or go through each driver version one at a time.
- Click “Next” to continue installing, then restart your laptop and see if your Wi-Fi is now operational. If it doesn’t, a different driver update might be available.
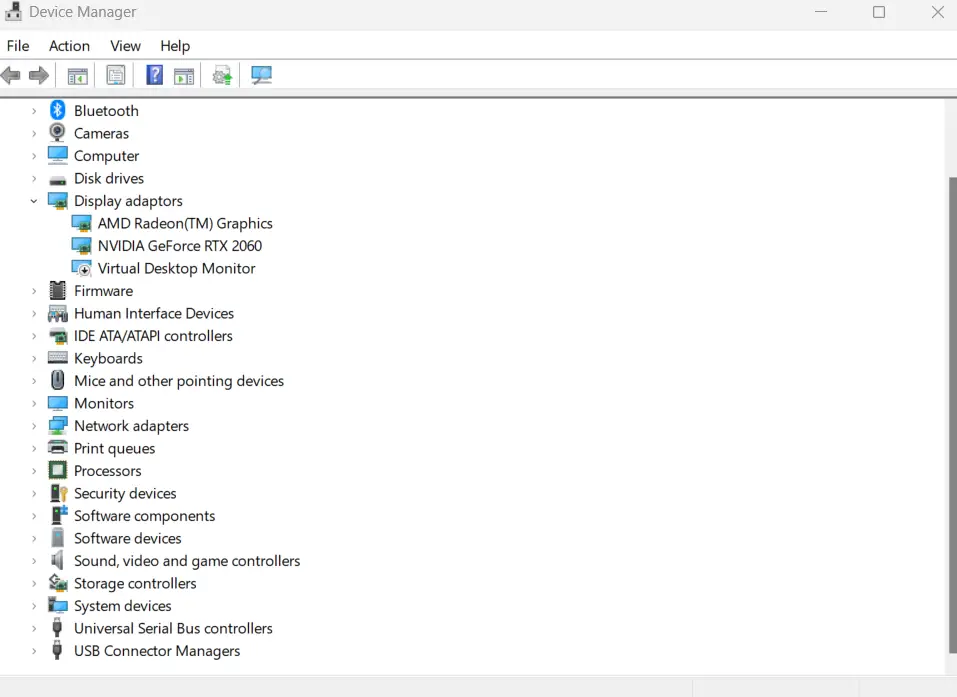
Remember that during this procedure your laptop will forget any saved network passwords, so you will need to input them again.
9. Restart your router and modem
Rebooting your router and modem clears the memory, completes blocked processes, and resets IP assignments, all of which can resolve Wi-Fi connectivity problems.
Today’s routers and modems are typically integrated, but if you have two separate devices, make sure you restart them both.
Here are ways to restart your modem:
- Switch off the power to the modem and router. Be aware that some modems contain a backup battery that enables them to continue functioning even after you unplug them from their power supply. For a restart to take place, you must also take out the battery.
- Wait for at least 30 seconds, ideally a minute. It’s important to exercise patience in this situation so that your devices and ISP (internet service provider) have enough time to detect the router and modem’s offline status.
- Plug the router’s power and give it time to boot up. It might take some time.
- Reconnect your laptop to the Wi-Fi network and attempt to surf the internet.
- Continue using this procedure if your laptop cannot connect to this network but other devices (like your phone or tablet) can. Contact your internet provider for troubleshooting if the network is not accessible to any devices.
Raed also:
- How to buy and sell gift cards legally in the USA, Europe, and other countries
- How to Archive TikTok Videos and Keep Them Safe
- How To Temporarily deactivate your Instagram account
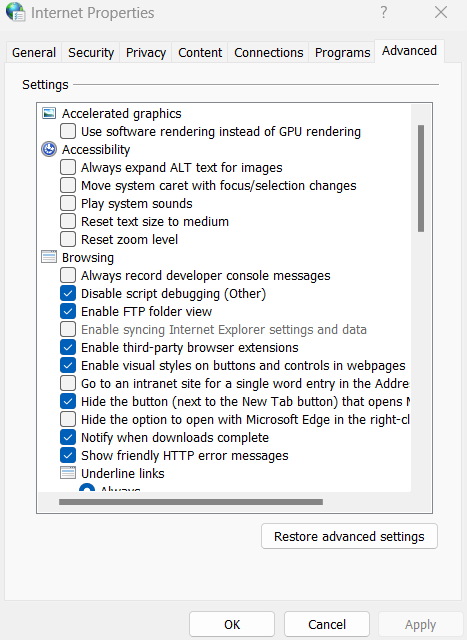
10. Restore Advanced Internet Settings
Wi-Fi connectivity problems have been known to be resolved by restoring advanced internet settings.
You should attempt the following if none of the ways mentioned above worked for you:
- Type “Internet Options” into the Windows search box and hit Enter.
- On the “Advanced” tab, click.
- Select “Restore Advanced Settings” from the menu.
- To make the adjustments, click “OK.”
- Restart your laptop to see if the issue has been resolved.
In little time at all, you should be able to browse the internet. Try our next remedy if you’re still seeing the “can’t connect” pop-up, though.
11. Renew Your IP Address
Consider removing and renewing your IP address if all of your network services are functional.
This procedure updates the IP address on your laptop and forces the router to immediately forget the previous one, resolving any connectivity issues it may have been causing. To accomplish this, launch the command prompt:
- Keep the “Windows” and “R” keys depressed at the same time.
- To launch the command prompt, type CMD into the search box and press Enter.
- Press enter once more while typing “ipconfig /release”.
- Hit enter after typing “ipconfig /renew”.
- If you can now connect to the Wi-Fi, check to make sure.
- If you are unable to, you should next type “ipconfig /flushdns” into the command prompt.
- Recheck your Wi-Fi connection.
If the aforementioned doesn’t work, you may also try the following commands while you’re in the command prompt: enter “netsh winsock reset,” “netsh winsock reset catalog,” and then “netsh int ip reset resetlog.txt” Reboot your PC.
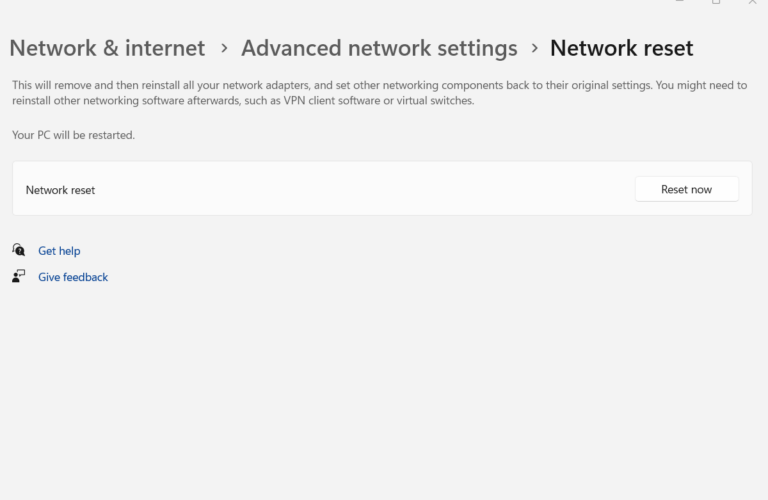
12. Conduct a Network Reset
Resetting all of your network settings should only be used as a last resort. Your network adapters will be installed again, and it will restore the default settings for all other networking components.
- Open Windows and choose “Settings.”
- Select the “Network Reset” option under “Network & Internet,” “Advanced Network Settings.”
- Choose “Reset Now,” then click “Yes.” As soon as the reset is finished, your laptop will restart itself. Usually, it takes a few minutes to complete the process.
13. Minimize wireless interference
Your wireless connection’s strength and reliability can be impacted by a variety of factors, including the frequency band, the physical position of the router, and the number of nearby devices.
Do the following so as to minimizing interference
- Additionally, make an effort to reduce physical impediments, particularly those that are composed of metal, reflecting glass, water, ceramic tile, concrete, brick, marble/stone, and walls.
- Place the router close to your laptop. The less distance the signal has to go and the more dependable it will be, the closer your laptop is to the router.
- Purchase an Ethernet cable. Ethernet cables unquestionably increase Wi-Fi speed and reliability. After all, it enables instantaneous data transmission and reception on your laptop (data goes through a cable, direct link without any interruption).
Connectivity problems are a complete anguish, but maybe one of our remedies has helped you.
Please share with us in the comments section below your experience or have a step that was not listed here, please share so we can update to help others.
Can malware make my laptop unable to connect to the internet via WiFi?
Yes
Malwarebytes and other antivirus programs can be used to detect and get rid of malware.