If you keep receiving “Mail Delivery Failed” or “Undeliverable” messages for emails you never sent, your domain may be a victim of email spoofing. This issue is common for businesses that use custom addresses like info@yourdomain.com or sales@yourdomain.com.
This article explains what causes it, how to confirm the source, and how to fix it permanently.
Why You’re Getting “Mail Delivery Failed” Spam and How to Stop It
If your inbox is suddenly flooded with “Mail Delivery Failed” or “Undeliverable” messages for emails you never sent, your domain is likely being used by spammers. This happens when attackers forge your address to send fake emails, causing bounce messages to return to you. The good news is that you can stop it completely by setting up a few simple email authentication records like SPF, DKIM, and DMARC.
Understanding the Problem
When you get many “mail delivery failed” notifications, it usually means someone is forging your email address to send spam. These messages are not coming from your mailbox but from other servers pretending to be you.
Here’s what happens:
- A spammer sends thousands of fake emails using your domain in the “From” field.
- Some of those emails are sent to invalid addresses.
- The receiving mail servers send “delivery failed” notices to your address, thinking you are the sender.
This is known as backscatter spam. It’s not caused by your server being hacked; instead, your domain name is being misused.
How to Confirm It’s Backscatter Spam
If you open one of those bounce messages, you may see something like this:
This message was created automatically by mail delivery software.
A message that you sent could not be delivered to one or more of its recipients.
The following address(es) failed:

  example@gmail.com
    (ultimately generated from shop@yourdomain.com)
    Message discarded as high-probability spam
Reporting-MTA: dns; server97.web-hosting.com
If you never sent the original message and see your domain name listed in the “From” field, your address is being spoofed.
The Solution: Authenticate Your Domain
To stop this, you need to prove to other mail servers that only your authorized servers can send messages for your domain.
You can do this by setting up three DNS records:
- SPF (Sender Policy Framework)
- DKIM (DomainKeys Identified Mail)
- DMARC (Domain-based Message Authentication, Reporting, and Conformance)
These records verify your domain’s email sources and block forged messages.
Step 1: Add an SPF Record
SPF identifies which mail servers are allowed to send email for your domain.
Example record:
v=spf1 include:server97.web-hosting.com -all
If you also send emails using another provider (like Google Workspace or Zoho), use:
v=spf1 include:server97.web-hosting.com include:_spf.google.com -all
Add this as a TXT record in your domain’s DNS settings.
The “-all” tells receiving servers to reject emails not listed here.
Step 2: Enable DKIM
DKIM adds a digital signature to your emails so that mail servers can verify they haven’t been tampered with.
If your hosting uses cPanel:
- Log in to cPanel.
- Go to Email → Email Deliverability.
- Click Manage beside your domain.
- Turn on DKIM and SPF.
Your hosting platform will automatically generate the correct DKIM record.
Step 3: Add a DMARC Record
DMARC builds on SPF and DKIM to tell mail servers what to do when an unauthenticated email claims to be from your domain.
To reject all fake emails:
v=DMARC1; p=reject; rua=mailto:admin@yourdomain.com; ruf=mailto:admin@yourdomain.com; fo=1
If you want to monitor first before blocking anything, use:
v=DMARC1; p=quarantine; pct=100; rua=mailto:admin@yourdomain.com
Add this as a TXT record named _dmarc in your DNS settings.
Step 4: Secure Your Email and Website
Even after setting up SPF, DKIM, and DMARC, you should:
- Change all email and hosting passwords.
- Use strong passwords that are unique to your accounts.
- Review your website forms and make sure they send messages through authenticated SMTP.
- Add CAPTCHA to all forms to prevent bots from using them to send spam.
Step 5: Test and Monitor Your Setup
After updating your DNS, allow a few hours for propagation.
Then test your configuration:
- https://mxtoolbox.com/spf.aspx — checks your SPF record.
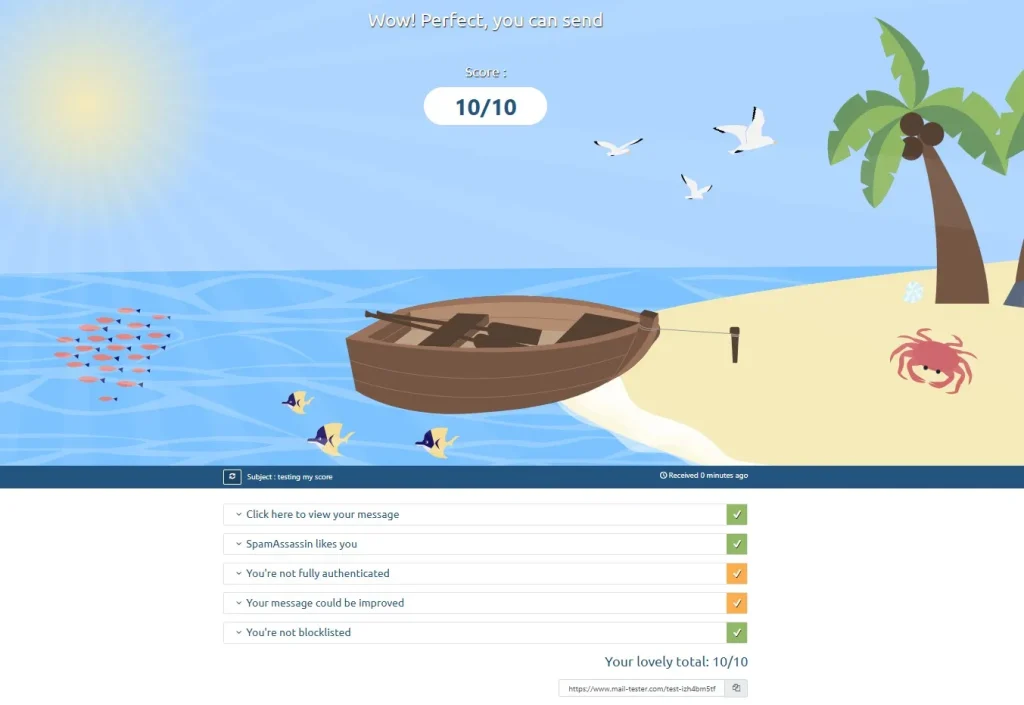
- https://www.mail-tester.com — tests if your emails are properly authenticated.
Once everything is correct, your domain’s reputation will improve and fake emails will stop reaching you.
What Happens After DMARC Is Active
After 24–48 hours, you’ll notice:
- The fake “mail delivery failed” messages stop.
- Spoofed emails are blocked before they bounce back to you.
- Your legitimate emails have better delivery rates.
You may start receiving DMARC reports at the email addresses you listed in your record. These reports show where your domain name is being used and whether the messages are legitimate or not.
Final Thoughts
If you’re receiving a large number of “mail delivery failed” emails, your domain is most likely being spoofed.
Setting up SPF, DKIM, and DMARC is the most effective way to stop it and protect your email reputation.
It takes just a few minutes to add these records, and once they are active, the problem will disappear completely.
Read also: